Getting Red Wine Stains Out of Wooden Chopping Boards: Methods That Won’t Damage the Wood
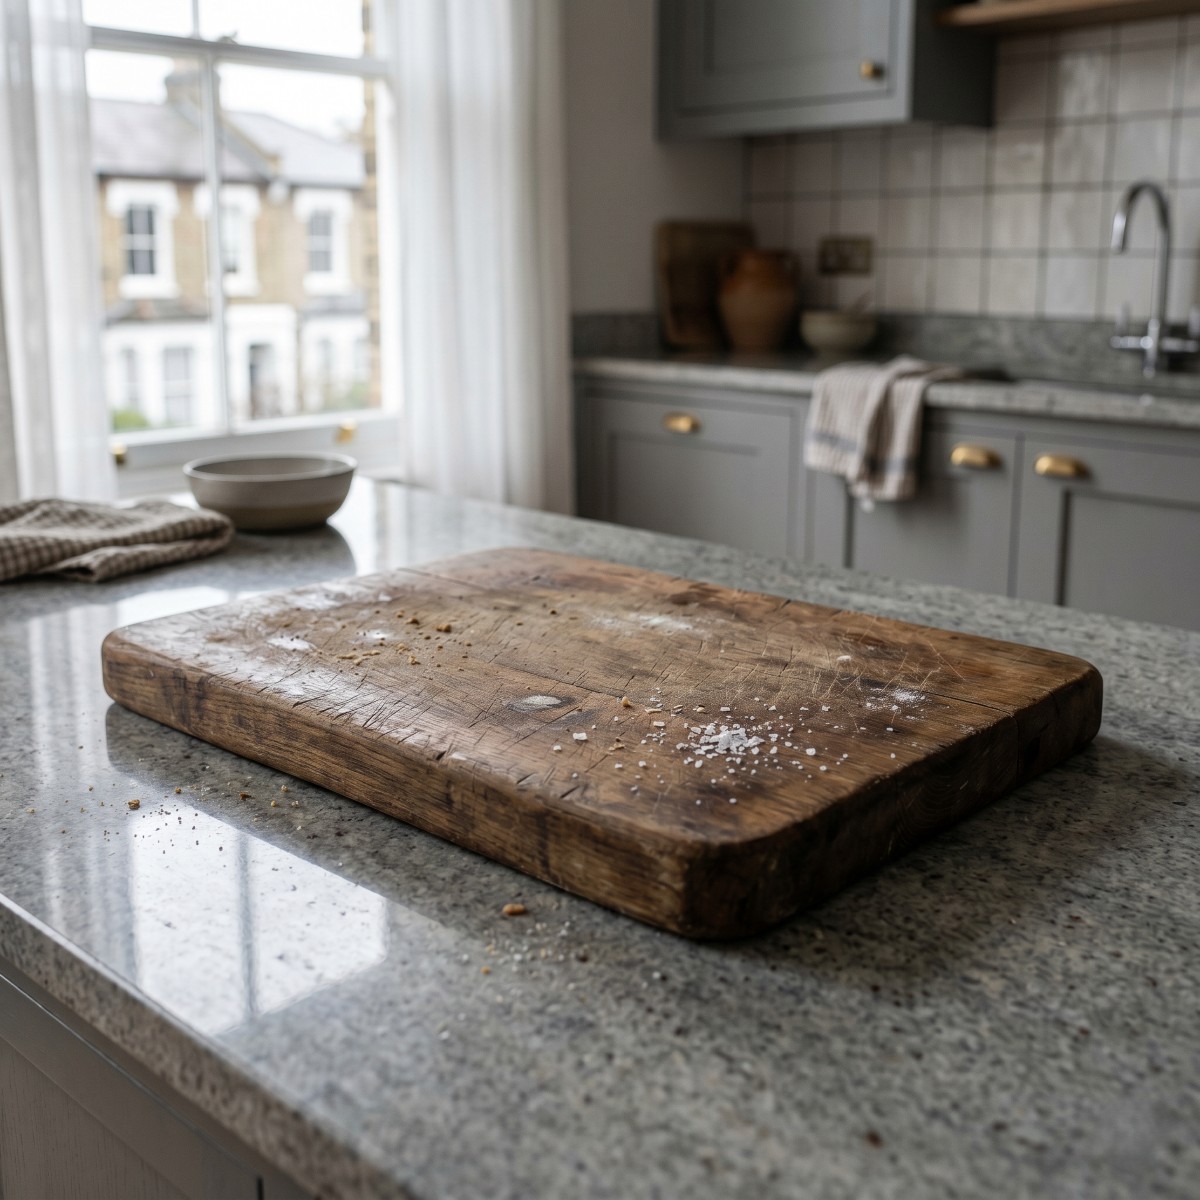
A wooden board doing double duty as a cheese and charcuterie spread is one of those effortlessly elegant moves that Chelsea kitchen suppers are built on. Prosciutto at one end, a decent wedge of Comté at the other, and someone’s generously filled glass of Barolo positioned just close enough to the edge to make the whole thing feel like a foregone conclusion. One enthusiastic reach for the grapes later, and your beautiful board is wearing rather more of the wine than the guests are.
It is a frustratingly common scenario – and the instinct to grab the nearest cloth and scrub is almost always the wrong one. Red wine stains on wood are stubborn, but they are not permanent. With the right approach and the right materials, you can remove them cleanly without bleaching, drying out, or otherwise punishing a board that probably cost considerably more than it should have.
Why Red Wine Stains Wood So Stubbornly – And Why That Matters Before You Start
Before you reach for anything, it helps to understand exactly what you are dealing with – because this is not simply a surface spill.
Red wine contains two compounds that conspire against you simultaneously. The first is tannins, naturally occurring polyphenols that bind aggressively to porous materials on contact. The second is anthocyanins, the deeply pigmented molecules responsible for red wine’s colour, which derived from dark-skinned grape varieties and which penetrate absorbent surfaces with remarkable efficiency. Wood, being a naturally porous material threaded with microscopic grain channels, offers these molecules an open invitation.
The moment wine meets an untreated or lightly oiled wooden surface, it does not simply sit there waiting politely to be wiped away. It is actively wicking deeper into the grain with every passing second, carried along by capillary action. This is why the distinction between a fresh stain and a set one matters so much: you are not just cleaning a surface, you are trying to draw pigment back out from within the material itself. Everything that follows is shaped by that reality.
Act Fast – The Golden Window for Fresh Red Wine Stains
If the wine has only just landed, you have a genuine advantage – and roughly ten to fifteen minutes to use it properly. During this window, the anthocyanins have not yet fully migrated into the deeper grain channels, and a swift, controlled response can remove the bulk of the stain before it becomes a longer project.
The single most important instruction here is one that feels counterintuitive in a moment of mild panic: blot, do not rub. A clean cloth or a thick wad of kitchen paper pressed firmly onto the stain will lift considerably more wine than any amount of vigorous scrubbing – which, incidentally, spreads the stain laterally and drives pigment further into the grain. Remove as much liquid as possible through firm, vertical pressure, then move immediately to the salt method below. Avoid rinsing with hot water at this stage, as heat can accelerate pigment bonding. Cold water only, and briefly.
The Salt Method for Immediate Treatment
Coarse sea salt is the right tool for the first few minutes after a spill. Pour a generous amount – a tablespoon or two – directly onto the stain and press it lightly onto the surface. Salt works by drawing liquid upward and outward through osmosis, pulling the wine away from the grain before it can travel deeper. Leave it to work for three to five minutes, then sweep it away with a dry cloth using outward strokes, never circles. The salt will have taken on a distinctly purple hue, which is satisfying evidence that it has done its job. Follow with a brief cold rinse, pat the board completely dry, and assess. If a faint shadow remains, move on to one of the methods below.
Tried-and-Tested Methods for Dried or Set-In Red Wine Stains
So the board was quietly left on the draining rack overnight, and this morning it is telling a story in burgundy. The salt moment has passed. What you need now is something with a bit more conviction – but still, critically, something that will not punish the wood in the process. These three methods are reliable, genuinely wood-safe, and use ingredients that are almost certainly already in your kitchen or bathroom cabinet.
Bicarbonate of Soda and White Vinegar Paste
Mix one tablespoon of bicarbonate of soda with just enough white wine vinegar to form a thick paste. It will fizz with some enthusiasm, which is entirely normal and mildly satisfying. Apply the paste directly to the stain and work it into the grain using a soft cloth or an old toothbrush, using gentle, deliberate strokes that follow the direction of the wood grain rather than working across it. The bicarbonate provides mild mechanical abrasion that lifts surface pigment, while the acetic acid in the vinegar begins to break down the tannin bonds that have formed between the stain and the wood fibres. Leave the paste to sit for five to ten minutes, then wipe away and rinse with cold water. Pat completely dry. Do not leave the board sitting wet at any stage.
Lemon Juice and Coarse Salt Scrub
This is the more pleasant-smelling option, and it is particularly effective on stains that have set but are not deeply embedded. Cut a lemon in half, press the cut face into a small pile of coarse salt, and use it to scrub directly over the stained area. The citric acid in the lemon juice provides gentle natural bleaching action, working on the pigment at a molecular level, while the salt serves as a fine abrasive that physically lifts discolouration from the grain surface. Scrub for a minute or two, then leave the juice to sit on the board for a further five minutes before rinsing clean. If you have a south-facing windowsill – not always a given in a Chelsea basement flat – placing the board in direct natural sunlight during this time gives a mild photochemical boost to the bleaching process. Rinse with cold water and dry immediately and thoroughly.
Hydrogen Peroxide (Used Carefully)
For older or more stubborn stains that the gentler methods have not fully resolved, 3% hydrogen peroxide – the cosmetic or food-safe grade available from most chemists – is a legitimate and effective step up. Apply a small amount to the stain using a cotton pad, leave it for no more than five minutes, then rinse the surface thoroughly with cold water. Hydrogen peroxide works by oxidising the anthocyanin molecules, effectively bleaching them from within the grain rather than simply abrading the surface. Two important caveats apply. First, always test on an inconspicuous area of the board beforehand, as some wood types and finishes react unpredictably. Second, do not use this method on a recently waxed or heavily oiled board without reconditioning the surface properly afterwards – hydrogen peroxide will strip protective coatings, leaving the wood temporarily vulnerable to moisture and further staining.
What You Should Never Use on a Wooden Chopping Board
This section may be the most practically important in the entire article. The well-meaning but catastrophic interventions are, in professional experience, frequently more damaging than the stain they were meant to address – and the kitchens of Chelsea and Kensington have seen their fair share of both.
Bleach seems like an obvious solution for something this stubbornly pigmented, but it is entirely unsuitable for wood. It aggressively dries out the grain, causes cracking and surface discolouration, and leaves chemical residues on a food-contact surface that simply should not be there. A board that smells of bleach has no business being near food preparation.
The dishwasher is where good chopping boards go to die. The combination of sustained high heat, prolonged moisture exposure, and high-pressure jets will warp, split, and delaminate even a well-constructed board across a handful of cycles. Glued joints fail. Cracks appear along the grain. The board becomes a hygiene liability rather than a kitchen asset – and a surprisingly expensive one to replace.
Steel wool and abrasive scouring pads will remove the visual stain along with the top layer of wood itself, leaving behind a network of fine scratches that harbour bacteria, trap food residue, and make the board significantly more susceptible to future staining. The surface that remains is both less sanitary and less attractive.
Soaking in water is similarly ruinous. Wood swells when waterlogged, then contracts unevenly as it dries – a cycle that leads to warping, splitting, and the kind of persistently wobbly board that serves no one well and eventually becomes unusable.
Reconditioning the Board After Stain Removal – The Step Everyone Forgets
Removing the stain is only the first half of the job, and the second half is the one most people skip entirely.
Any effective cleaning process – particularly one involving acidic agents such as lemon juice, white vinegar, or hydrogen peroxide – will strip some of the protective oils or wax from the wood’s surface, leaving the grain temporarily more exposed and considerably more vulnerable to moisture, bacteria, and future staining. A cleaned but unreconditioned board is, in some ways, more at risk than it was before you started.
Once the board is fully clean and completely dry, apply a generous coat of food-grade oil, working it into the surface with a clean cloth along the direction of the grain. Food-grade mineral oil is the standard recommendation: it is odourless, completely tasteless, does not turn rancid over time, and penetrates the grain effectively. Coconut oil is a popular alternative with a more pleasant scent, though it has a longer absorption time. If your board had a wax finish prior to treatment, a rub with a food-safe beeswax block will restore the surface well. Leave the oil or wax to absorb for several hours – overnight is considerably better – then wipe away any remaining excess. A properly reconditioned board is noticeably more resistant to staining, far easier to clean day-to-day, and will reward the extra ten minutes of attention with years of additional useful life.
Prevention Is Better Than a Ruined Chopping Board
The most effective defence against red wine stains is a board that is regularly oiled and properly maintained – one whose grain channels are already well saturated, leaving significantly less room for wine, berry juice, or olive oil to penetrate. Boards conditioned on a monthly basis absorb liquids far more slowly than dry, neglected ones, which effectively extends your response window considerably when accidents happen.
A few practical habits make a real difference over time. A brief rinse with cold water immediately after contact – before the wine has any chance to begin drying – is vastly more effective than leaving it until the washing up. Keeping a secondary board near any open bottles during preparation is a sensible precaution that takes all of thirty seconds to implement. And ensuring the board is properly dried and stored flat after each wash prevents the warping that makes future cleaning harder and less effective.
The honest truth is that red wine and dinner parties in SW3 are an enduring and entirely non-negotiable combination, and no preparation eliminates the element of human unpredictability entirely. But with a well-oiled board, a packet of coarse sea salt in the cupboard, and a passing familiarity with the methods above, the odds are firmly in your favour.